> ## Documentation Index
> Fetch the complete documentation index at: https://uncoded.ch/docs/llms.txt
> Use this file to discover all available pages before exploring further.
# Set up your Binance Account
> Create and configure your Binance account with a subaccount and Spot Trading API key so unCoded can trade on your behalf.
This section covers everything you need to do on Binance before connecting it to unCoded:
1. Create a Binance account with a 20% fee discount
2. Create a subaccount for clean tax separation and independent tracking
3. Generate a Spot Trading API key with the correct permissions
Before you can create subaccounts or API keys, Binance requires at least **two security methods** on your account: email verification (always required) plus one additional method such as Google Authenticator, SMS authentication, or a security key (YubiKey, etc.). Enable a second method under **Account → Security** in your Binance dashboard before continuing.
***
## Create your Binance account
Use the unCoded [Referral Link](https://bit.ly/B-20Fee) to create your Binance account.
Registering through this link gives you **20% less in trading fees** on Binance. It also reduces the unCoded profit share from 30% to **20%**. Dont worry if you already have an account - check out the [unCoded Licensing FAQs](/introduction/licensing-and-payments) to learn how to reduce your fees anyway.
On the sign-up page, choose your preferred method:
* **Email** — enter your email address and create a secure password.
* **Phone number** — use your phone number to register.
Enter the referral code if it is not pre-filled, agree to Binance's terms and conditions, and click **Create Account**.
Referral Code: EKFKTJP3
Complete the **Know Your Customer (KYC)** process to enable full trading capabilities:
1. Provide a government-issued ID (passport, driver's license, etc.).
2. Upload a selfie for identity verification.
3. Submit proof of address if your region requires it.
Verification typically takes just a few minutes but may vary by region.
With your Binance account successfully created and verified, the next step is to configure it properly for unCoded so the bot can trade securely and efficiently.
***
## Create a Binance subaccount
A subaccount separates unCoded's trading activity from your personal trades, making tax reporting and performance tracking cleaner.
**Security Requirement:** Before you can create or use sub-accounts and API, Binance requires you to have at least **two security methods enabled**:
* **E-Mail verification** (standard, always required).
* **Plus one more method**, such as:
* ✅ Google Authenticator (recommended)
* ✅ SMS Authentication
* ✅ Security Key (YubiKey, etc.)
* To enable this:
* Log in to your [**Binance account**](https://accounts.binance.com/en/login) on the web and go to your [**dashboard**](https://www.binance.com/en/my/dashboard).
* On the left-hand side, click **Account → [Security](https://www.binance.com/en/my/security)**.
* Add and activate at least one extra security method next to your email.
Log in to your [Binance account](https://accounts.binance.com/en/login) on the web and go to your [dashboard](https://www.binance.com/en/my/dashboard). In the left-hand menu, select **Sub-Accounts → [Account Management](https://www.binance.com/en/my/sub-account/account-management)**.
Click **Create Sub Account** and choose an account type:
* **Email (recommended)** — creates a dedicated login for the subaccount.
* **Virtual email** — no separate login required. For Developers only!
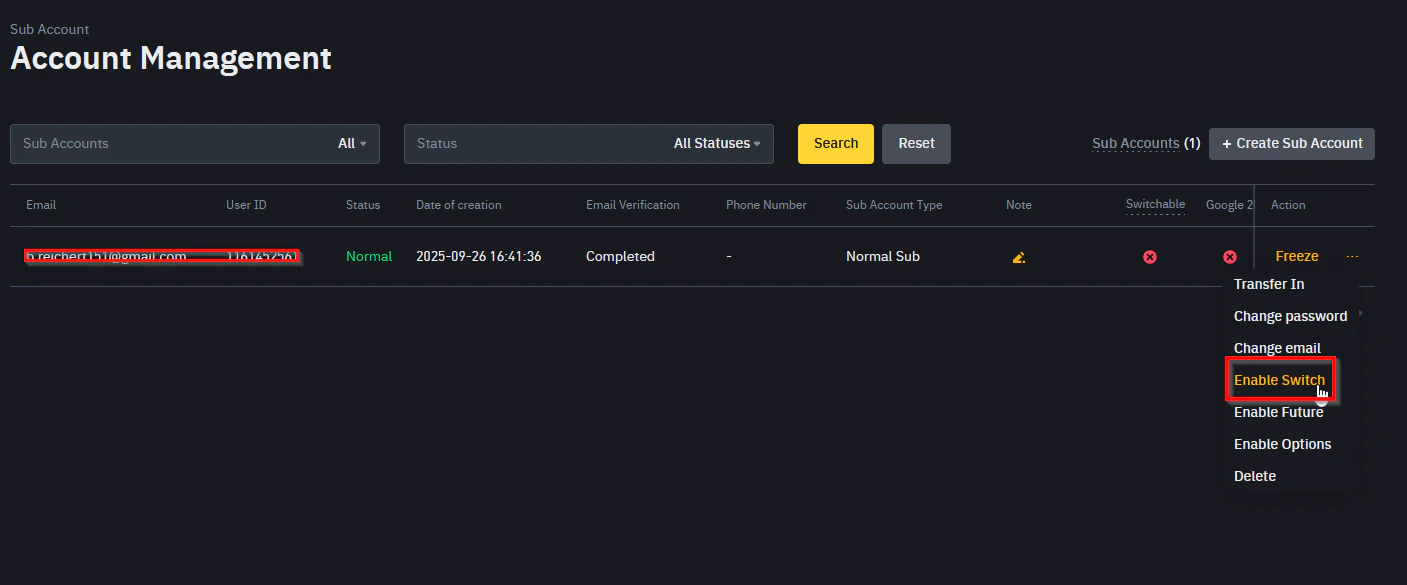
If you create a real email subaccount, go back to **Account Management**, find the new subaccount, click the **three dots**, and select **Switchable**. This lets you switch between accounts from the top-right profile menu and gives the subaccount the same UI as the main account.
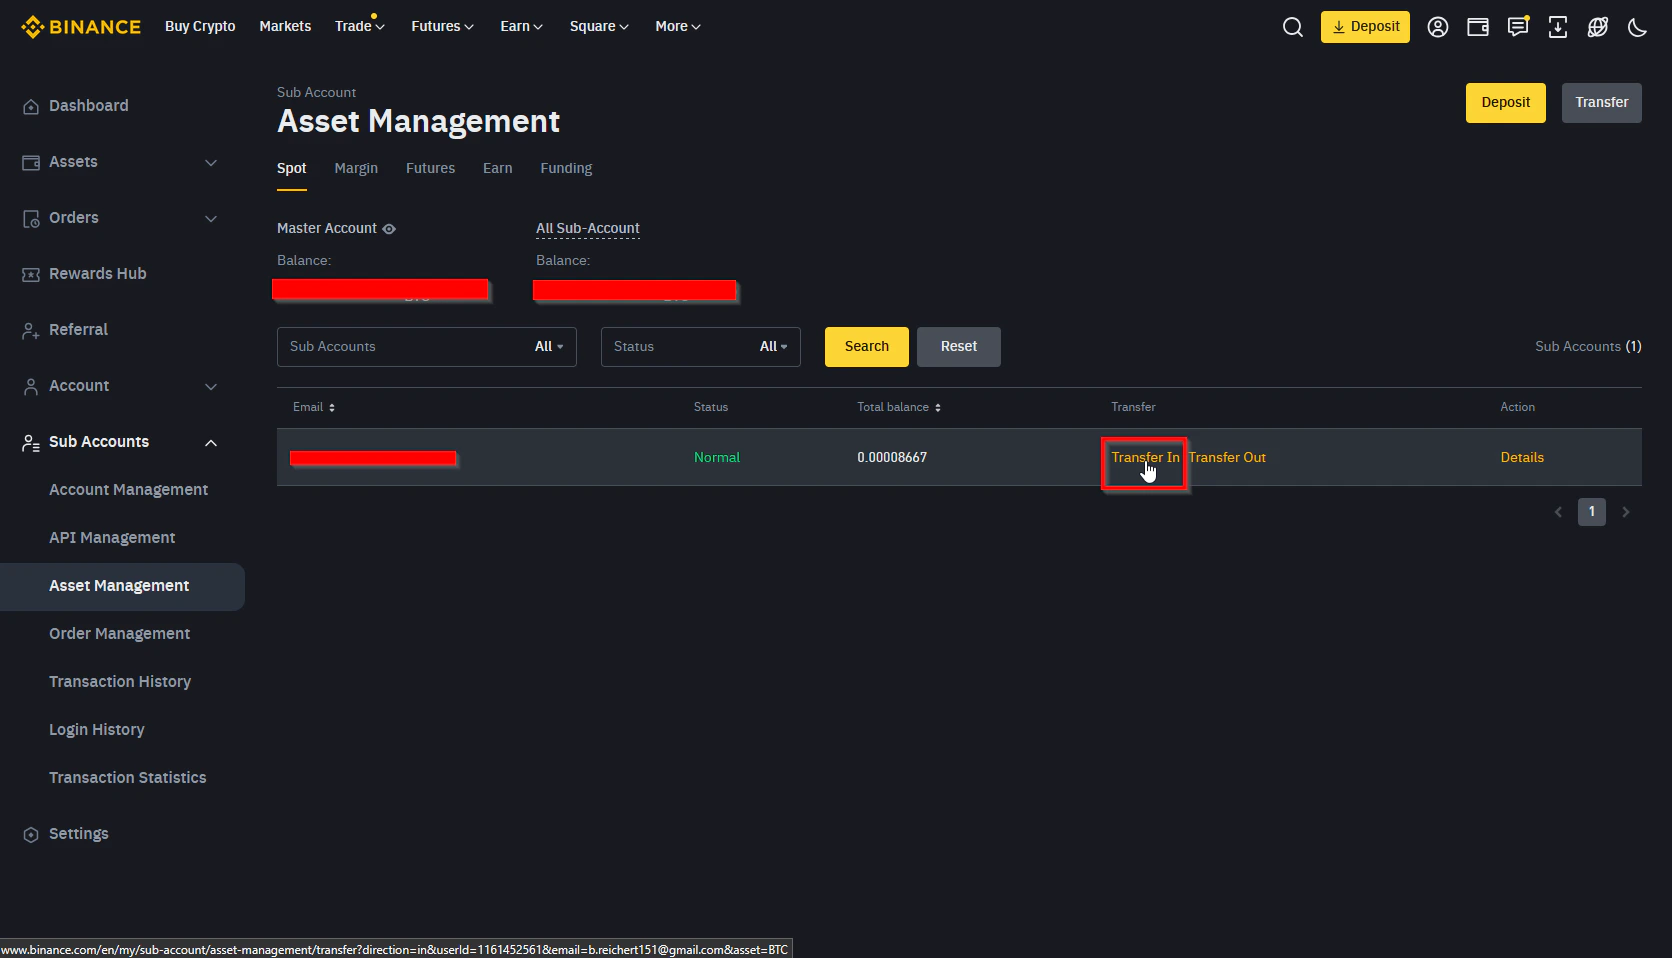
In the **Sub-Accounts** dropdown, go to [**Asset Management**](https://www.binance.com/en/my/sub-account/asset-management). Find your new subaccount row and click **Transfer In**.
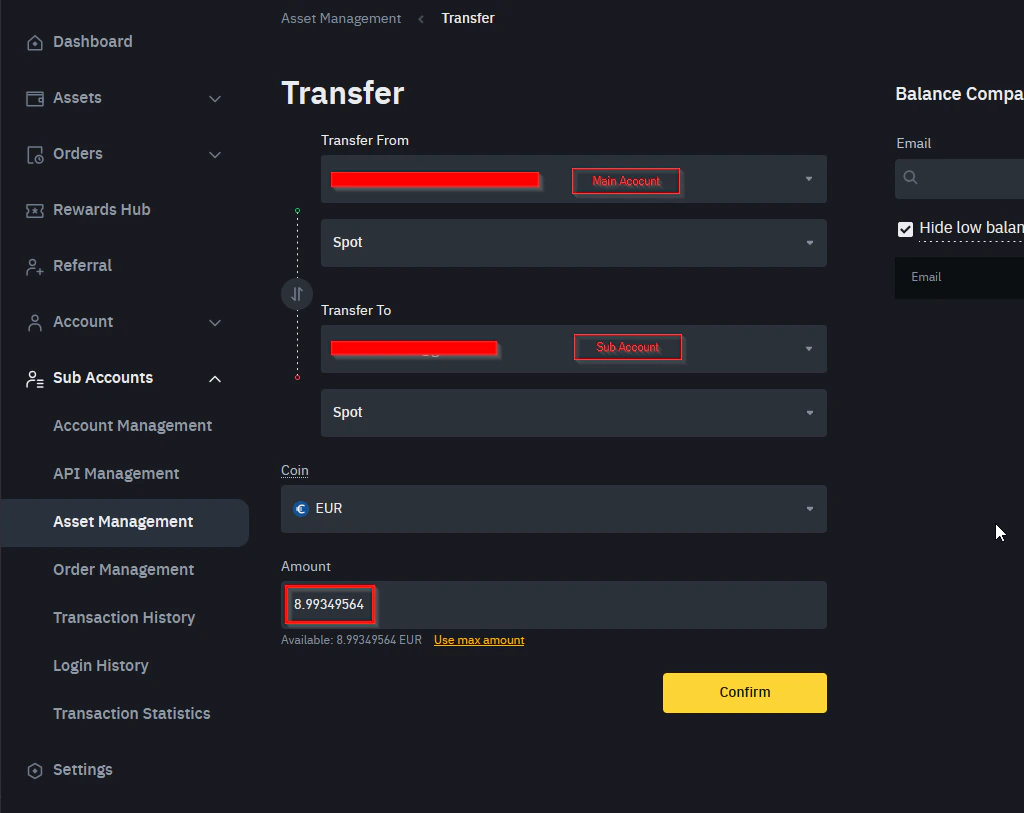
On the transfer page, select a currency, enter the amount, and confirm:
* **USDC** — recommended for users within the EU (stable and widely supported).
* **FDUSD** — recommended for users outside the EU; Binance offers zero trading fees on FDUSD pairs.
* **BNB** — keep at least \~\$50 worth. Binance uses BNB to pay fees and gives a **25% discount** on every trade.
Binance has an official guide with screenshots here: [How to Create a Sub-Account](https://www.binance.com/de/square/post/12695672498873)
***
## Create the Spot Trading API key
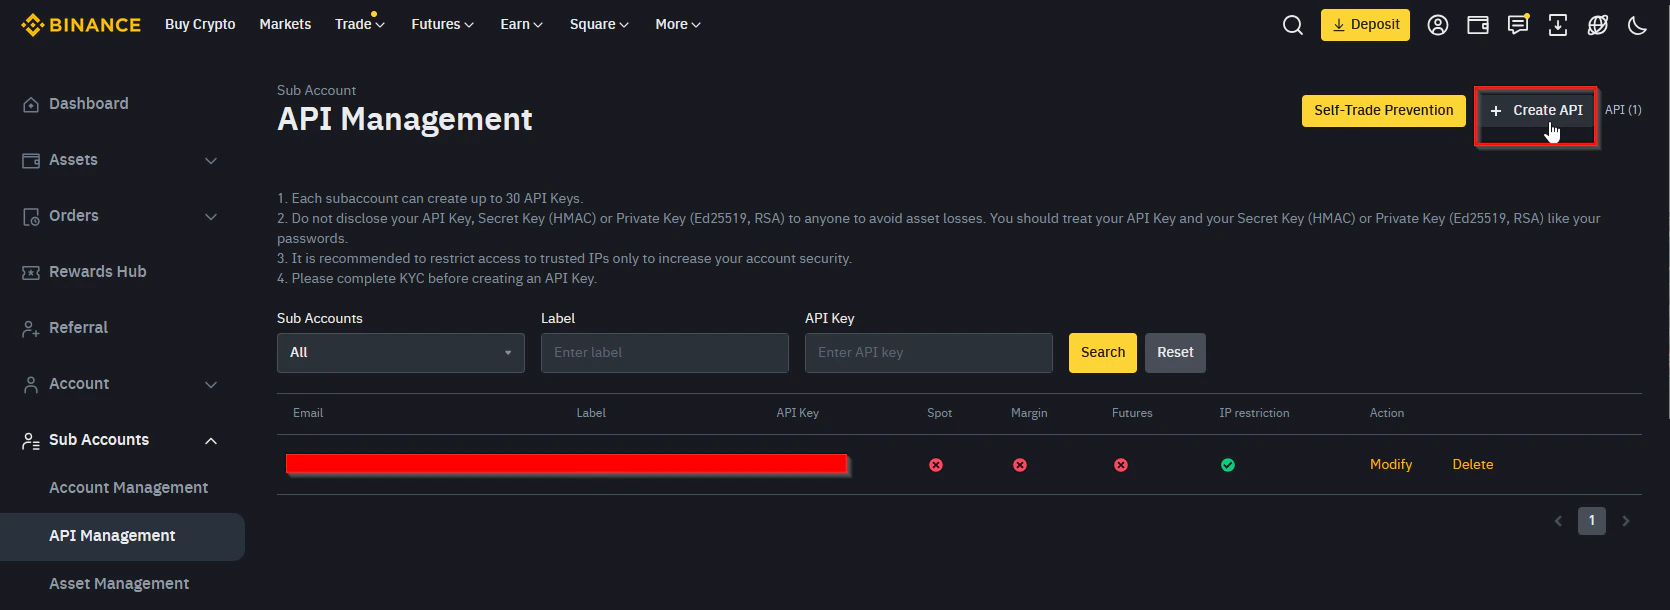
In your Binance dashboard, go to [**API Management**](https://www.binance.com/en/my/sub-account/api-management).
If you are using a subaccount, switch to this Sub Account first.
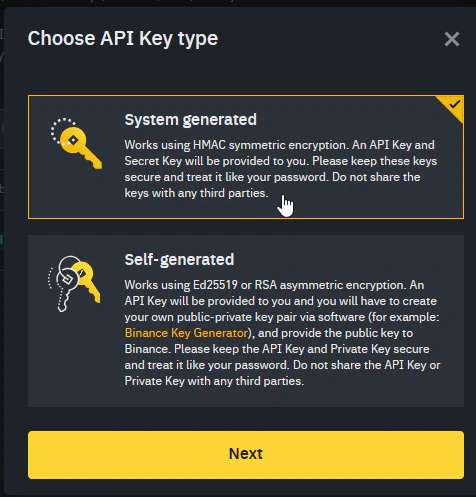
Click **Create API** and choose **System Generated API Key**. Label the key (e.g., `unCodedBot`), then confirm using your security methods — Binance will always require email plus one additional method (Google Authenticator, SMS, etc.).
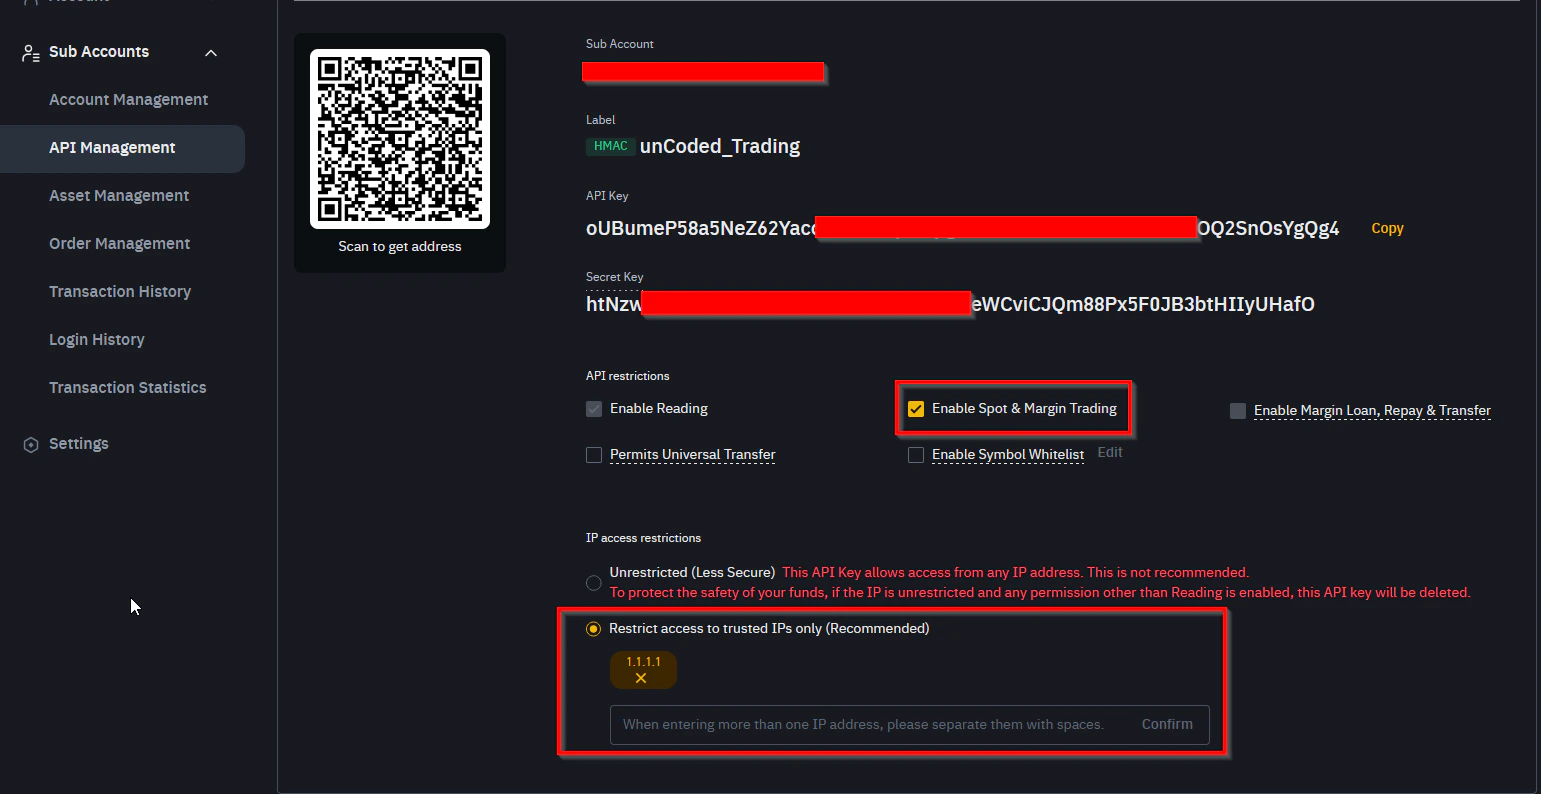
Set the following permissions on the key:
* **Read Info** — enabled
* **Enable Spot & Margin Trading** — enabled
All other permissions should remain **disabled**. unCoded only needs read access and spot trading rights.
Under **IP Access Restrictions**, restrict the key to your server's static IP address. This is required — your server must have a static IP. See [System Requirements](/introduction/system-requirements) for hardware and networking requirements.
Copy the **API Key** and **Secret Key** and store them somewhere safe.
The Secret Key is shown only once. If you leave the page before copying it, you will need to delete the API key and create a new one. Do not share these credentials with anyone. Delete any temporary file you use to store them once the setup is complete.
Temporarily store all configuration values in a plain text file (Notepad or similar) so you can copy and paste them into unCoded during deployment without losing track of your credentials.
***
Once your subaccount is funded and your API key is saved, you are ready to set up your unCoded account. Continue to [Create your unCoded account](/getting-started/create-uncoded-account).
 If you create a real email subaccount, go back to **Account Management**, find the new subaccount, click the **three dots**, and select **Switchable**. This lets you switch between accounts from the top-right profile menu and gives the subaccount the same UI as the main account.
 On the transfer page, select a currency, enter the amount, and confirm:
* **USDC** — recommended for users within the EU (stable and widely supported).
* **FDUSD** — recommended for users outside the EU; Binance offers zero trading fees on FDUSD pairs.
* **BNB** — keep at least \~\$50 worth. Binance uses BNB to pay fees and gives a **25% discount** on every trade.
On the transfer page, select a currency, enter the amount, and confirm:
* **USDC** — recommended for users within the EU (stable and widely supported).
* **FDUSD** — recommended for users outside the EU; Binance offers zero trading fees on FDUSD pairs.
* **BNB** — keep at least \~\$50 worth. Binance uses BNB to pay fees and gives a **25% discount** on every trade.
 Under **IP Access Restrictions**, restrict the key to your server's static IP address. This is required — your server must have a static IP. See [System Requirements](/introduction/system-requirements) for hardware and networking requirements.